
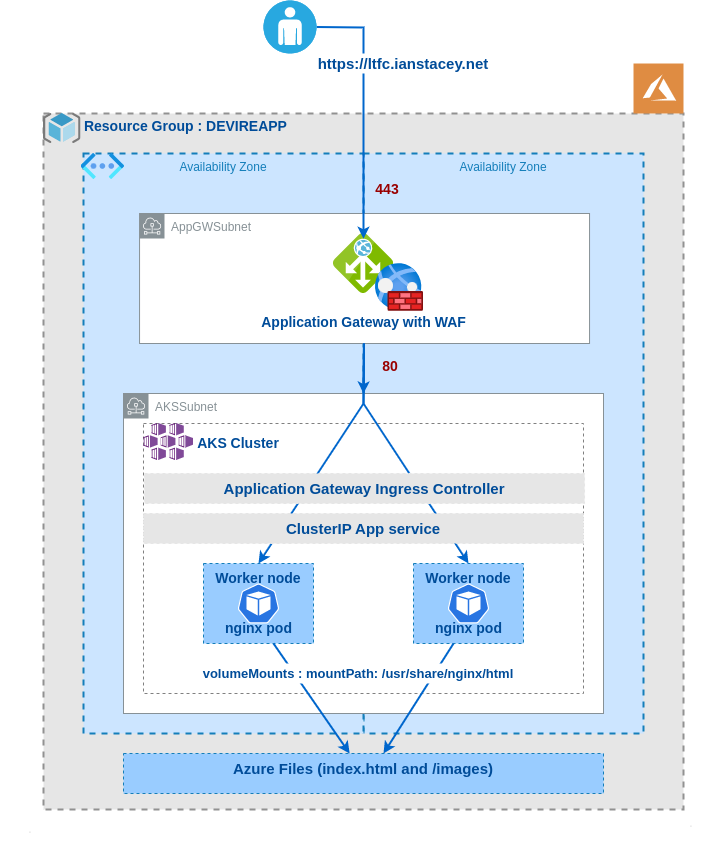
Aim:
Securely publish website in a new AKS (Azure Kubernetes Service) cluster.
Create the Azure Resources:
For this project to work we require the Azure CLI version 2.0.53 or later. Run az –version to find the version.
Use ‘az login’ to log into the Azure account:
az loginThis command opens the default browser and loads the Azure sign-in page, I have two-factor authentication enabled and need my phone to confirm access.
Set Variables:
export RG=DEVIREAPP
export LOCATION=northeurope
export VNET=vndevireap
export AKSNAME=devireaks02
export STORAGEACCT=devirestor0110
export CIDR=10.202

export ACR=acr4devire
export AGW=devaksAGWopenop
export AGWPIP=devagwPIPopenop
Create a new Resource Group and Virtual Network:
az group create --name $RG --location $LOCATION
az network vnet create -g $RG -n $VNET --address-prefix $CIDR.0.0/16
Create subnets:
One subnet for the AKS cluster and another for Application Gateway
az network vnet subnet create --address-prefixes $CIDR.0.0/22 --name=AKSSubnet -g $RG --vnet-name $VNET

az network vnet subnet create --address-prefixes $CIDR.4.0/24 --name=AppGwSubnet -g $RG --vnet-name $VNET
Check with:
$ az network vnet subnet list -g $RG --vnet-name $VNET -o table
AddressPrefix    Name         PrivateEndpointNetworkPolicies    PrivateLinkServiceNetworkPolicies    ProvisioningState    ResourceGroup
---------------  -----------  --------------------------------  -----------------------------------  -------------------  ---------------
10.202.0.0/22    AKSSubnet    Enabled                           Enabled                              Succeeded            DEVIREAPP
10.202.4.0/24    AppGwSubnet  Enabled                           Enabled                              Succeeded            DEVIREAPP
Create an Azure Container Registry:
I will not use this initially, but I will create for future use.
az acr create --resource-group $RG --name $ACR --sku Basic
## List images in registry (None yet)
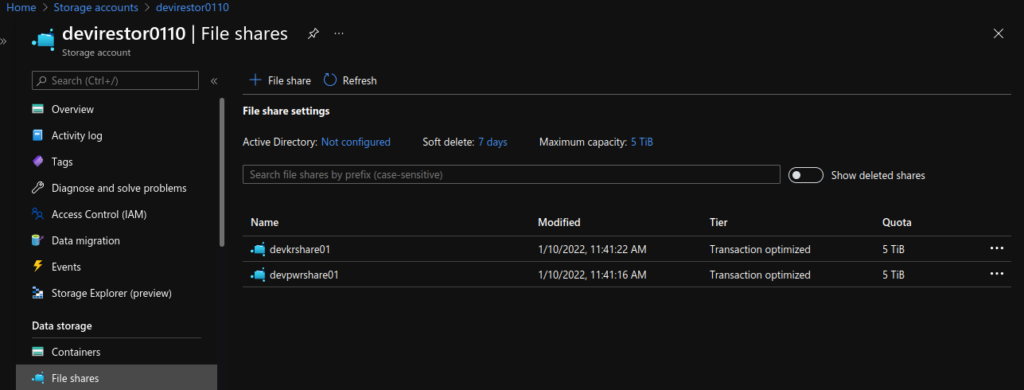
az acr repository list --name $ACR --output tableCreate Storage Account and Azure File share
Following https://docs.microsoft.com/en-us/azure/aks/azure-files-volume
#Set variables:
AKS_PERS_STORAGE_ACCOUNT_NAME=devirestor0110
AKS_PERS_RESOURCE_GROUP=DEVIREAPP
AKS_PERS_LOCATION=northeurope
AKS_PERS_SHARE_NAME1=devpwrshare01
AKS_PERS_SHARE_NAME2=devkrshare01
az storage account create -n $AKS_PERS_STORAGE_ACCOUNT_NAME -g $AKS_PERS_RESOURCE_GROUP -l $AKS_PERS_LOCATION --sku Standard_LRS
export AZURE_STORAGE_CONNECTION_STRING=$(az storage account show-connection-string -n $AKS_PERS_STORAGE_ACCOUNT_NAME -g $AKS_PERS_RESOURCE_GROUP -o tsv)
echo $AZURE_STORAGE_CONNECTION_STRING
az storage share create -n $AKS_PERS_SHARE_NAME1 --connection-string $AZURE_STORAGE_CONNECTION_STRING
az storage share create -n $AKS_PERS_SHARE_NAME2 --connection-string $AZURE_STORAGE_CONNECTION_STRING
STORAGE_KEY=$(az storage account keys list --resource-group $AKS_PERS_RESOURCE_GROUP --account-name $AKS_PERS_STORAGE_ACCOUNT_NAME --query "[0].value" -o tsv)
echo $AKS_PERS_STORAGE_ACCOUNT_NAME
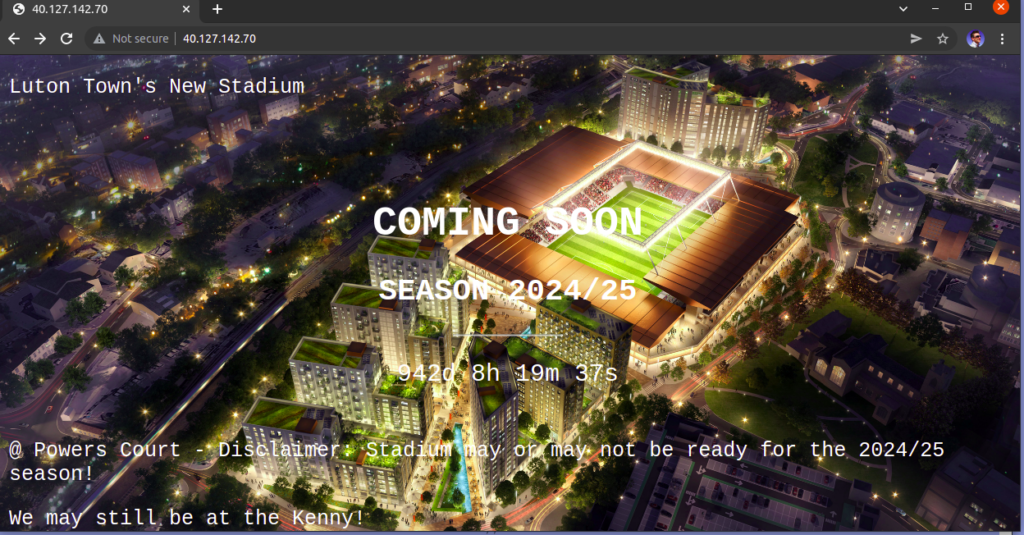
echo $STORAGE_KEYUpload index.html files and images folders to file share via Azure Portal
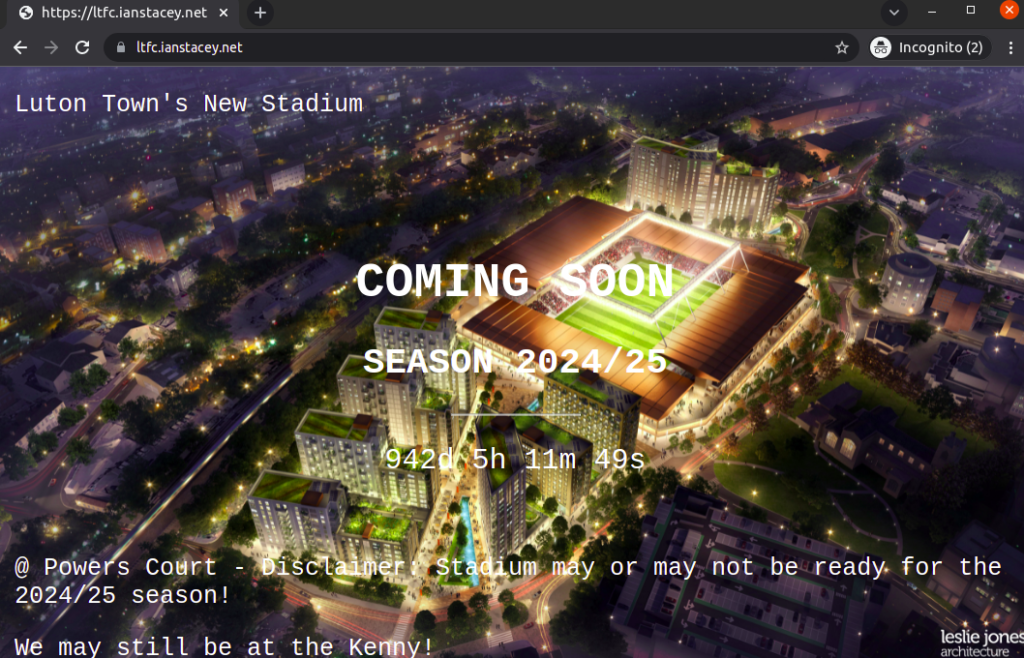
The index.html page is based on https://www.w3schools.com/howto/howto_css_coming_soon.asp and related to one of my favorite subjects Luton Town FC! 🙂
Create AKS Cluster:
With the CLI, there are many options available, see https://docs.microsoft.com/en-us/cli/azure/aks?view=azure-cli-latest#az-aks-create
# Get Subnet ID and set as variable
SUBNET_ID=$(az network vnet subnet show --resource-group $RG --vnet-name $VNET --name AKSSubnet --query id -o tsv)
az aks create \
--resource-group $RG \
--name $AKSNAME \
--node-count 2 \
--node-vm-size standard_b2s \
--generate-ssh-keys \
--zones 1 2 \
--attach-acr $ACR \
--network-plugin azure \
--vnet-subnet-id $SUBNET_ID \
--enable-managed-identityThe new AKS cluster will appear in the resource group that we created, however, the automatically created Application Gateway instance will be in the node resource group, where the agent pools are. The node resource group by is named MC_resource-group-name_cluster-name_location by default, but can be modified. See https://docs.microsoft.com/en-us/azure/application-gateway/tutorial-ingress-controller-add-on-new#deploy-an-aks-cluster-with-the-add-on-enabled for more.

Connect to the cluster:
If necessary install the Kubernetes CLI (az aks install-cli) and then connect:
$ az aks get-credentials --resource-group $RG --name $AKSNAME
Merged "devireaks02" as current context in /home/istacey/.kube/config

$ kubectl get nodes -o wide
NAME                                STATUS   ROLES   AGE     VERSION   INTERNAL-IP   EXTERNAL-IP   OS-IMAGE             KERNEL-VERSION     CONTAINER-RUNTIME
aks-nodepool1-30510450-vmss000000   Ready    agent   8m22s   v1.21.7   10.202.0.4    <none>        Ubuntu 18.04.6 LTS   5.4.0-1064-azure   containerd://1.4.9+azure
aks-nodepool1-30510450-vmss000001   Ready    agent   8m7s    v1.21.7   10.202.0.35   <none>        Ubuntu 18.04.6 LTS   5.4.0-1064-azure   containerd://1.4.9+azure
Deploy a new Application Gateway:
# First create new PublicIP
az network public-ip create -n $AGWPIP -g $RG --allocation-method Static --sku Standard

# Then deploy the App Gateway
az network application-gateway create -n $AGW -l $LOCATION -g $RG --sku Standard_v2 --public-ip-address $AGWPIP --vnet-name $VNET --subnet AppGwSubnet
List as below, note a ingress-appgw-deployment pod will be created in the cluster.
$ az network application-gateway list -g $RG -o table
Location     Name         OperationalState    ProvisioningState    ResourceGroup    ResourceGuid
-----------  -----------  ------------------  -------------------  ---------------  ------------------------------------
northeurope  DevIreAppGW  Running             Succeeded            DEVIREAPP        84cb167c-2505-4c52-be15-1c4eb54e198f
Enable the AGIC add-on:
appgwId=$(az network application-gateway show -n $AGW -g $RG -o tsv --query "id")

az aks enable-addons -n $AKSNAME -g $RG -a ingress-appgw --appgw-id $appgwId
Create the Kubernetes Deployment
Create new namespace:
kubectl create ns lutonCreate a Kubernetes secret:
kubectl -n luton create secret generic azure-secret --from-literal=azurestorageaccountname=$AKS_PERS_STORAGE_ACCOUNT_NAME --from-literal=azurestorageaccountkey=$STORAGE_KEYDeploy the Application:
The kubectl apply command will set up the sample application that uses AGIC for Ingress to the cluster. AGIC will update the Application Gateway created earlier with corresponding routing rules to the new application deployed.
$ cat luton-power-deployment.yaml
apiVersion: apps/v1
kind: Deployment
metadata:
  name: ltfcpwercrt
  namespace: luton
  labels:
    app: ltfcpwercrt
spec:
  replicas: 2
  selector:
      matchLabels:
        app: ltfcpwercrt
  template:
    metadata:
      labels:
        app: ltfcpwercrt
    spec:
      containers:
      - name: ltfcpwercrt
        image: nginx
        volumeMounts:
        - name: powermount
          mountPath: /usr/share/nginx/html
      volumes:
      - name: powermount
        azureFile:
          secretName: azure-secret
          shareName: devpwrshare01
          readOnly: false

---

apiVersion: v1
kind: Service
metadata:
  name: ltfcpwercrt
  namespace: luton
spec:
  selector:
    app: ltfcpwercrt
  ports:
  - protocol: TCP
    port: 80
    targetPort: 80

---

apiVersion: networking.k8s.io/v1
kind: Ingress
metadata:
  name: ltfcpwercrt
  namespace: luton
  annotations:
    kubernetes.io/ingress.class: azure/application-gateway
spec:
  rules:
  - http:
      paths:
      - path: /
        backend:
          service:
            name: ltfcpwercrt
            port:
              number: 80
        pathType: Exact


$ kubectl apply -f luton-power-deployment.yaml
deployment.apps/ltfcpwercrt created
service/ltfcpwercrt created
ingress.networking.k8s.io/ltfcpwercrt created
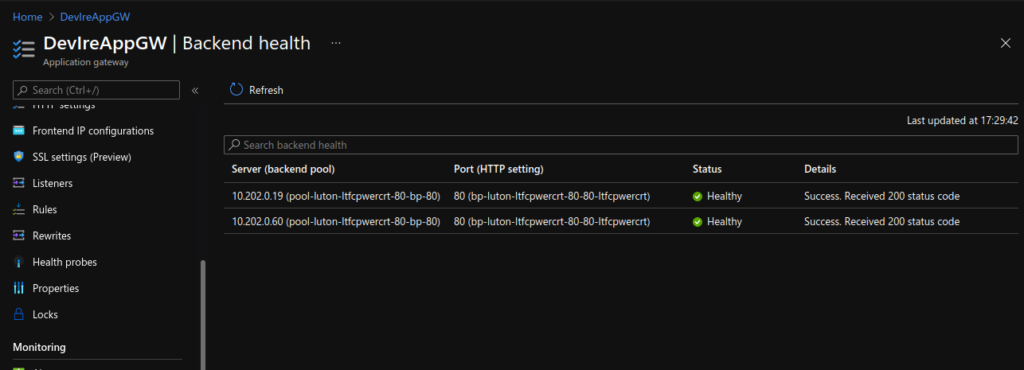
Basic checks:
Also get Public IP.
$ kubectl get all -n luton
NAME                               READY   STATUS    RESTARTS   AGE
pod/ltfcpwercrt-6499d886b7-9xb97   1/1     Running   0          25s
pod/ltfcpwercrt-6499d886b7-w4vkz   1/1     Running   0          25s

NAME                  TYPE        CLUSTER-IP     EXTERNAL-IP   PORT(S)   AGE
service/ltfcpwercrt   ClusterIP   10.0.145.174   <none>        80/TCP    26s

NAME                          READY   UP-TO-DATE   AVAILABLE   AGE
deployment.apps/ltfcpwercrt   2/2     2            2           26s

NAME                                     DESIRED   CURRENT   READY   AGE
replicaset.apps/ltfcpwercrt-6499d886b7   2         2         2       26s


$ kubectl get ingress -n luton
NAME          CLASS    HOSTS   ADDRESS         PORTS   AGE
ltfcpwercrt   <none>   *       40.127.142.70   80      33s

$ kubectl get deployment ingress-appgw-deployment -n kube-system
NAME                       READY   UP-TO-DATE   AVAILABLE   AGE
ingress-appgw-deployment   1/1     1            1           7h33m
And Test:
Add DNS record in AWS Route 53:
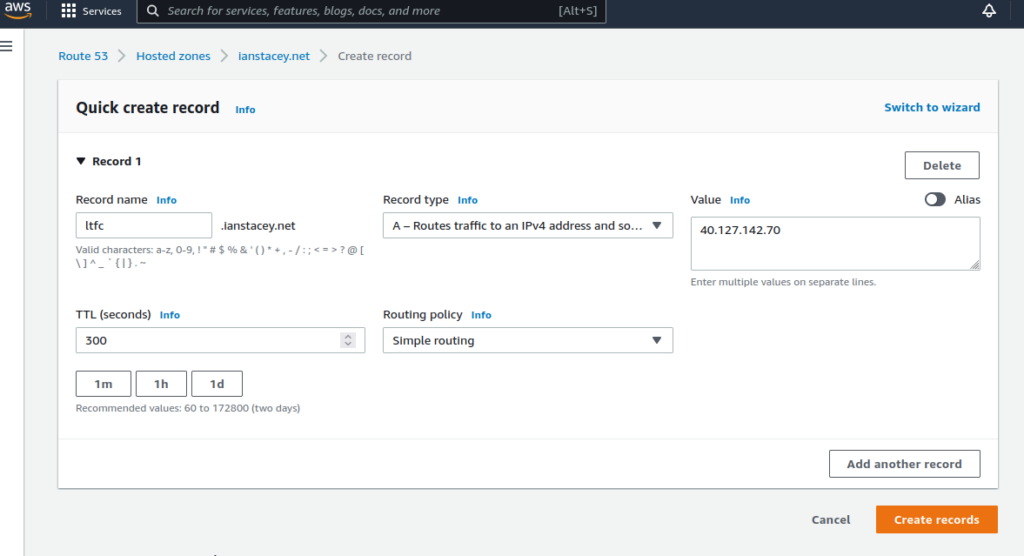
$ nslookup ltfc.ianstacey.net | grep answer -A2
Non-authoritative answer:
Name: ltfc.ianstacey.net
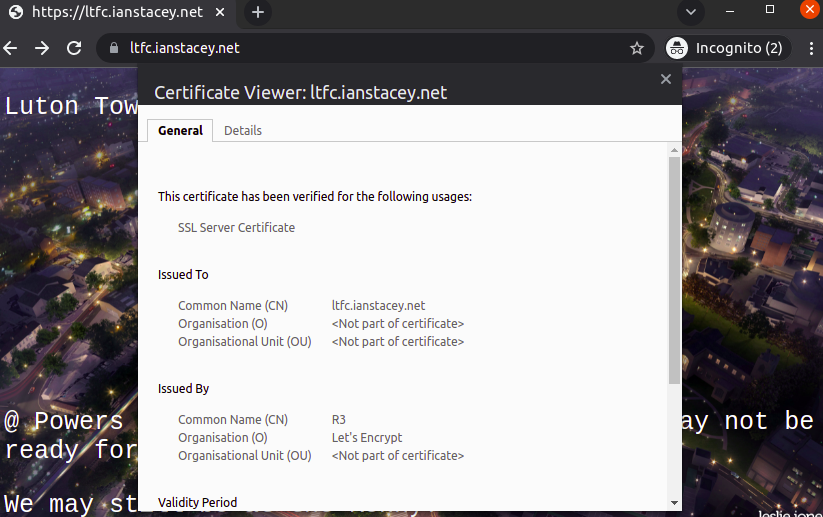
Address: 40.127.142.70Generate SSL Certificate to use HTTPS:
Following https://www.nginx.com/blog/using-free-ssltls-certificates-from-lets-encrypt-with-nginx with my DNS record temporarily re-pointing to a Ubuntu VM
#From Ubuntu VM with nginx and the Let’s Encrypt client, certbot, already installed.

$ sudo vi /etc/nginx/conf.d/ltfc.ianstacey.net.conf
$ cat /etc/nginx/conf.d/ltfc.ianstacey.net.conf
server {
    listen 80 default_server;
    listen [::]:80 default_server;
    root /var/www/html;
    server_name ltfc.ianstacey.net;
}

$ sudo nginx -t && sudo nginx -s reload
nginx: the configuration file /etc/nginx/nginx.conf syntax is ok
nginx: configuration file /etc/nginx/nginx.conf test is successful

$ sudo certbot --nginx -d ltfc.ianstacey.net
Saving debug log to /var/log/letsencrypt/letsencrypt.log
Plugins selected: Authenticator nginx, Installer nginx
Obtaining a new certificate....
Export the SSL Cert:
# cd /etc/letsencrypt/live/ltfc.ianstacey.net/

# openssl pkcs12 -export -out certificate.pfx -inkey privkey.pem -in cert.pem -certfile chain.pem
Enter Export Password:
Verifying - Enter Export Password:
Add HTTPS listener:
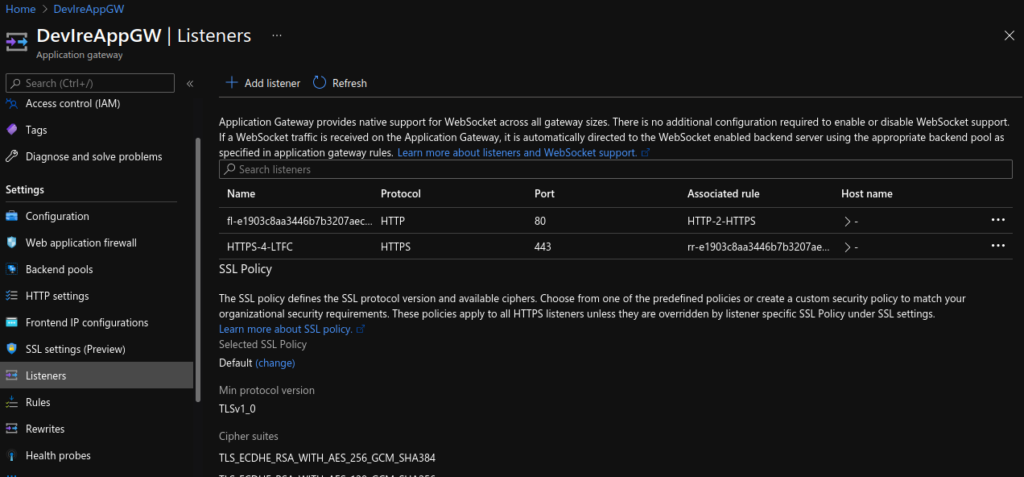
scp the certificate.pfx file to the local desktop and add HTTPS listener to the App Gateway via the portal:

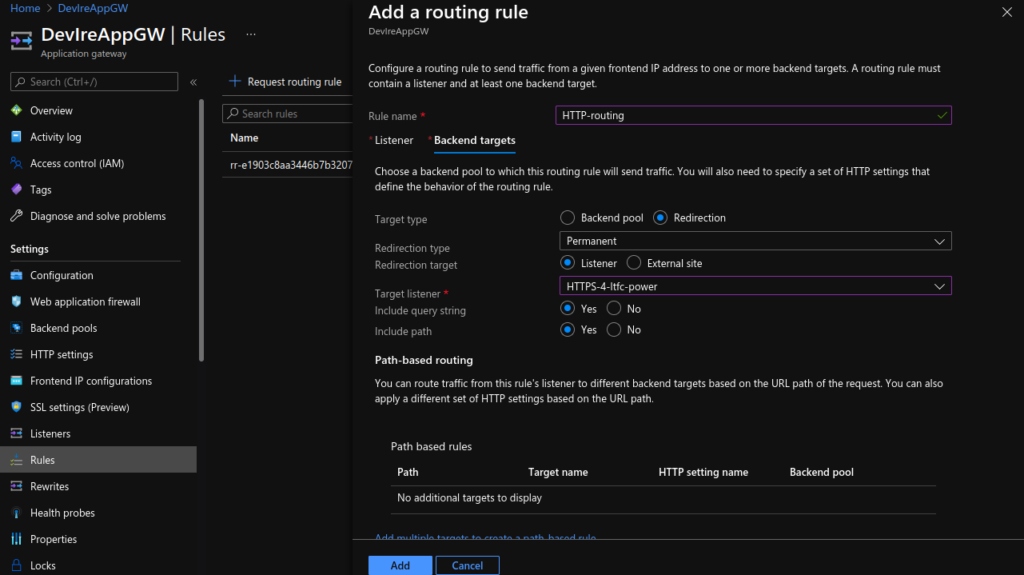
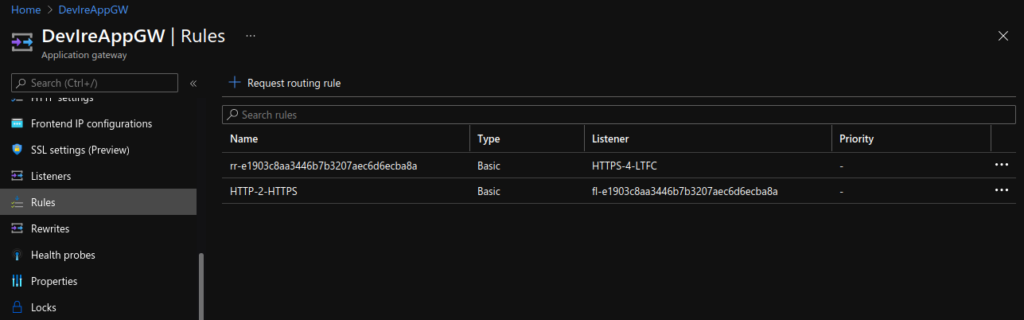
Create HTTP to HTTPS redirect:
Add routing rule:
App Gateway Views:
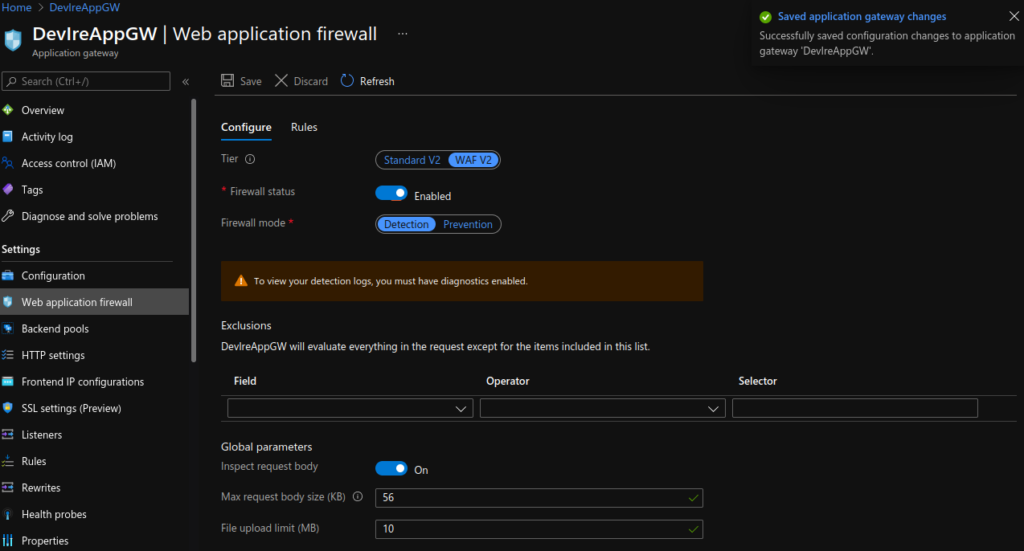
Test HTTPS:
HTTP and HTTPS requests are now securely directed to https://ltfc.ianstacey.net
The Finished Architecture:

Resources:
- https://docs.microsoft.com/en-us/azure/application-gateway/ingress-controller-overview
- https://docs.microsoft.com/en-us/azure/application-gateway/tutorial-ingress-controller-add-on-new#deploy-an-aks-cluster-with-the-add-on-enabled
- https://docs.microsoft.com/en-us/azure/application-gateway/tutorial-ingress-controller-add-on-existing
- https://docs.microsoft.com/en-us/cli/azure/aks?view=azure-cli-latest#az-aks-create
- https://www.danielstechblog.io/custom-naming-support-for-aks-node-resource-group-available
- https://kubernetes.io/docs/concepts/services-networking/ingress/
- And others linked in the sections above
Clean Up
When no longer needed, remove the resource group, application gateway, and all related resources.
az group delete --name $RG
az group delete --name MC_DEVIREAPP_devireaks02_northeurope