Hosting this simple WordPress site on AWS:
The Aim:
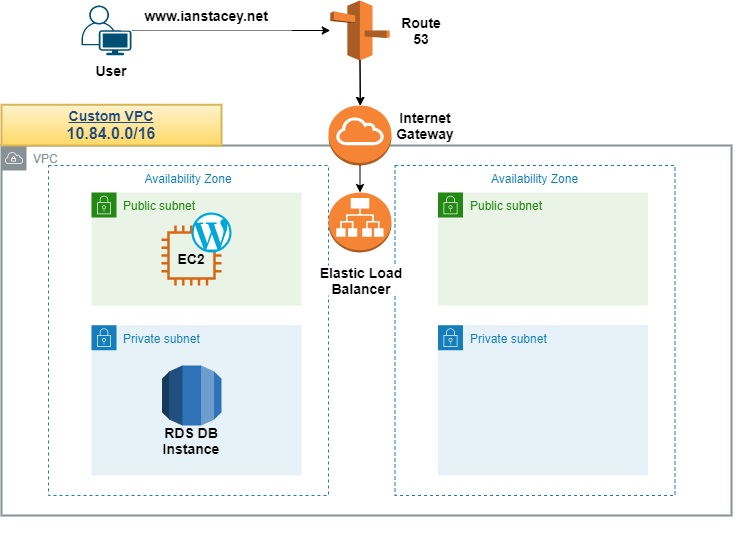
Deploy a personal website and blog in AWS using a previously registered domain name: ianstacey.net using the free tier, setting up a WordPress site on a single EC2 instance with Amazon RDS for MySQL to run the MySQL database.
For the exercise I mostly followed https://aws.amazon.com/getting-started/hands-on/deploy-wordpress-with-amazon-rds/ with additional tasks, including creating a new VPC, deploying a Load Balancer and updating Route 53.
I also used https://docs.aws.amazon.com/AWSEC2/latest/UserGuide/SSL-on-amazon-linux-2.html , https://docs.aws.amazon.com/AWSEC2/latest/UserGuide/hosting-wordpress.html as reference and reviewed Lab exercises performed as part of Adrian Cantrill’s https://learn.cantrill.io/p/aws-certified-solutions-architect-associate-saa-c02 course.

1. VPC:
My first step was to create a new VPC in eu-central-1 Frankfurt with a 10.84.0.0/16 CIDR and four subnets, 2 public and 2 private across 2 Availability Zones.
2. Creating a MySQL Database with RDS:
After deleting my first DB as it was associated with all four of my subnets, I created a Subnet Group containing my two private subnets before creating my new DB instance.

Next I created the RDS database, with MySQL as the engine, choosing the latest available version of MySQL and selecting the free tier.

Stepping through the options I set:
- My DB instance identifier.
- The master username and password for my database.
- Instance class and storage details, as I’m using the free tier options are limited.
- The configure connectivity and network configuration, choosing my new VPC and Subnet Group
- Created a new Security Group, for now without any Inbound rules set, this will come later
- Set the initial database name
3. Creating an EC2 Instance:
Next to create an Amazon EC2 instance to run the WordPress site, selecting Launch instance to open the instance creation wizard and selecting
- The AMI of Amazon Linux 2
- An instance type of t2.micro, free tier-eligible
- Selecting my VPC and a public subnet
- Minimal storage
- Added a Name Tag
- Configured a new Security, limiting ssh access from only my home and office IP and allowing HTTP from outside for initial testing
- Created and downloaded a new key pair
4. Configuring Your RDS Database
At this point I’ve created my RDS database and my EC2 instance, the next action is to configure the RDS database.
- Allow access from the EC2 instance to the RDS database by updating the Security Group created earlier, 3306 as the port and referencing the source Security Group of the instance.

- ssh to the EC2 instance with the .pem file downloaded earlier and install a MySQL client to interact with the database
sudo yum install -y mysql- Find the hostname for the RDS database in the AWS console. In the details of the RDS database, the hostname will be shown as the Endpoint in the Connectivity & security section.
- Use the dig command from the EC2 instance to check DNS
- In the terminal, enter the following command to set an environment variable for the MySQL host. Be sure to replace “<your-endpoint>” with the hostname of the RDS instance.
export MYSQL_HOST=<your-endpoint>- Next, run the following command in the terminal to connect to the MySQL database. Replace “<user>” and “<password>” with the master username and password configured when creating the RDS database.
mysql --user=<user> --password=<password> wordpress- If connected successfully, the terminal should indicate connection to the MySQL database as shown in the following image.

- Finally, create a database user for the WordPress application and give it permission to access the “wordpress” database. Run the following commands, substituting “wordpress-pass” for a strong password :
CREATE USER 'wordpress' IDENTIFIED BY 'wordpress-pass';
GRANT ALL PRIVILEGES ON wordpress.* TO wordpress;
FLUSH PRIVILEGES;
Exit
An alternative method to the above is to Configure Authentication Variables.
DBName='wordpress'
DBUser='wordpress'
DBPassword='REPLACEME'
DBRootPassword='REPLACEME'
STEP: Create WordPress DB
echo "CREATE DATABASE $DBName;" >> /tmp/db.setup
echo "CREATE USER '$DBUser'@'localhost' IDENTIFIED BY '$DBPassword';" >> /tmp/db.setup
echo "GRANT ALL ON $DBName.* TO '$DBUser'@'localhost';" >> /tmp/db.setup
echo "FLUSH PRIVILEGES;" >> /tmp/db.setup
mysql -u root --password=$DBRootPassword < /tmp/db.setup
sudo rm /tmp/db.setup5. Install Apache on EC2
To run WordPress, you need to run a web server on your EC2 instance. Apache and Nginx are popular web servers used with WordPress, choosing the best one is a matter of some debate.
- I’ve installed Apache on the EC2 instance with the following command:
sudo yum install -y httpd- To start the Apache web server, run the following commands in the terminal:
sudo service httpd enable
sudo service httpd start- Confirm Apache is working by browsing to the Public IP of the EC2 instance

6. Download and Configure WordPress on EC2
In this step, we will download the WordPress software and set up the configuration.
First, download and uncompress the software by running the following commands in the terminal:
wget https://wordpress.org/latest.tar.gz
tar -xzf latest.tar.gz
If you run “ls” to view the contents of your directory, you will see a tar file and a directory called wordpress with the uncompressed contents.
$ ls
latest.tar.gz  wordpress
Change into the wordpress directory and create a copy of the default config file using the following commands:
cd wordpress
cp wp-config-sample.php wp-config.php
Then, open the wp-config.php file using vi:
vi wp-config.phpYou need to edit two areas of configuration.
First, edit the database configuration by changing the following lines:
// ** MySQL settings - You can get this info from your web host ** //
/** The name of the database for WordPress */
define( 'DB_NAME', 'database_name_here' );

/** MySQL database username */
define( 'DB_USER', 'username_here' );

/** MySQL database password */
define( 'DB_PASSWORD', 'password_here' );

/** MySQL hostname */
define( 'DB_HOST', 'localhost' );
The values should be:
- DB_NAME: “wordpress”
- DB_USER: The name of the user you created in the database in the previous module
- DB_PASSWORD: The password for the user you created in the previous module.
- DB_HOST: The hostname of the database that you found in the previous module.
The second configuration section you need to configure is the Authentication Unique Keys and Salts. It looks as follows in the configuration file:
/**#@+
 * Authentication Unique Keys and Salts.
 *
 * Change these to different unique phrases!
 * You can generate these using the {@link https://api.wordpress.org/secret-key/1.1/salt/ WordPress.org secret-key service}
 * You can change these at any point in time to invalidate all existing cookies. This will force all users to have to log in again.
 *
 * @since 2.6.0
 */
define( 'AUTH_KEY',         'put your unique phrase here' );
define( 'SECURE_AUTH_KEY',  'put your unique phrase here' );
define( 'LOGGED_IN_KEY',    'put your unique phrase here' );
define( 'NONCE_KEY',        'put your unique phrase here' );
define( 'AUTH_SALT',        'put your unique phrase here' );
define( 'SECURE_AUTH_SALT', 'put your unique phrase here' );
define( 'LOGGED_IN_SALT',   'put your unique phrase here' );
define( 'NONCE_SALT',       'put your unique phrase here' );
Go to this link to generate values for this configuration section. Replace the entire content in that section with the content from the link. Save and exit from vi.
With the configuration updated, we are almost ready to deploy the WordPress site. In the next step, we will make your WordPress site live.
7. Deploying WordPress
In this step, we will download the WordPress software and set up the configuration, making the Apache web server handle requests for WordPress.
First, install the application dependencies we need for WordPress. In the terminal, run the following command.
sudo amazon-linux-extras install -y lamp-mariadb10.2-php7.2 php7.2Second, change to the proper directory by running the following command:
cd /home/ec2-userThen, copy your WordPress application files into the /var/www/html directory used by Apache.
sudo cp -r wordpress/* /var/www/html/Finally, restart the Apache web server to pick up the changes.
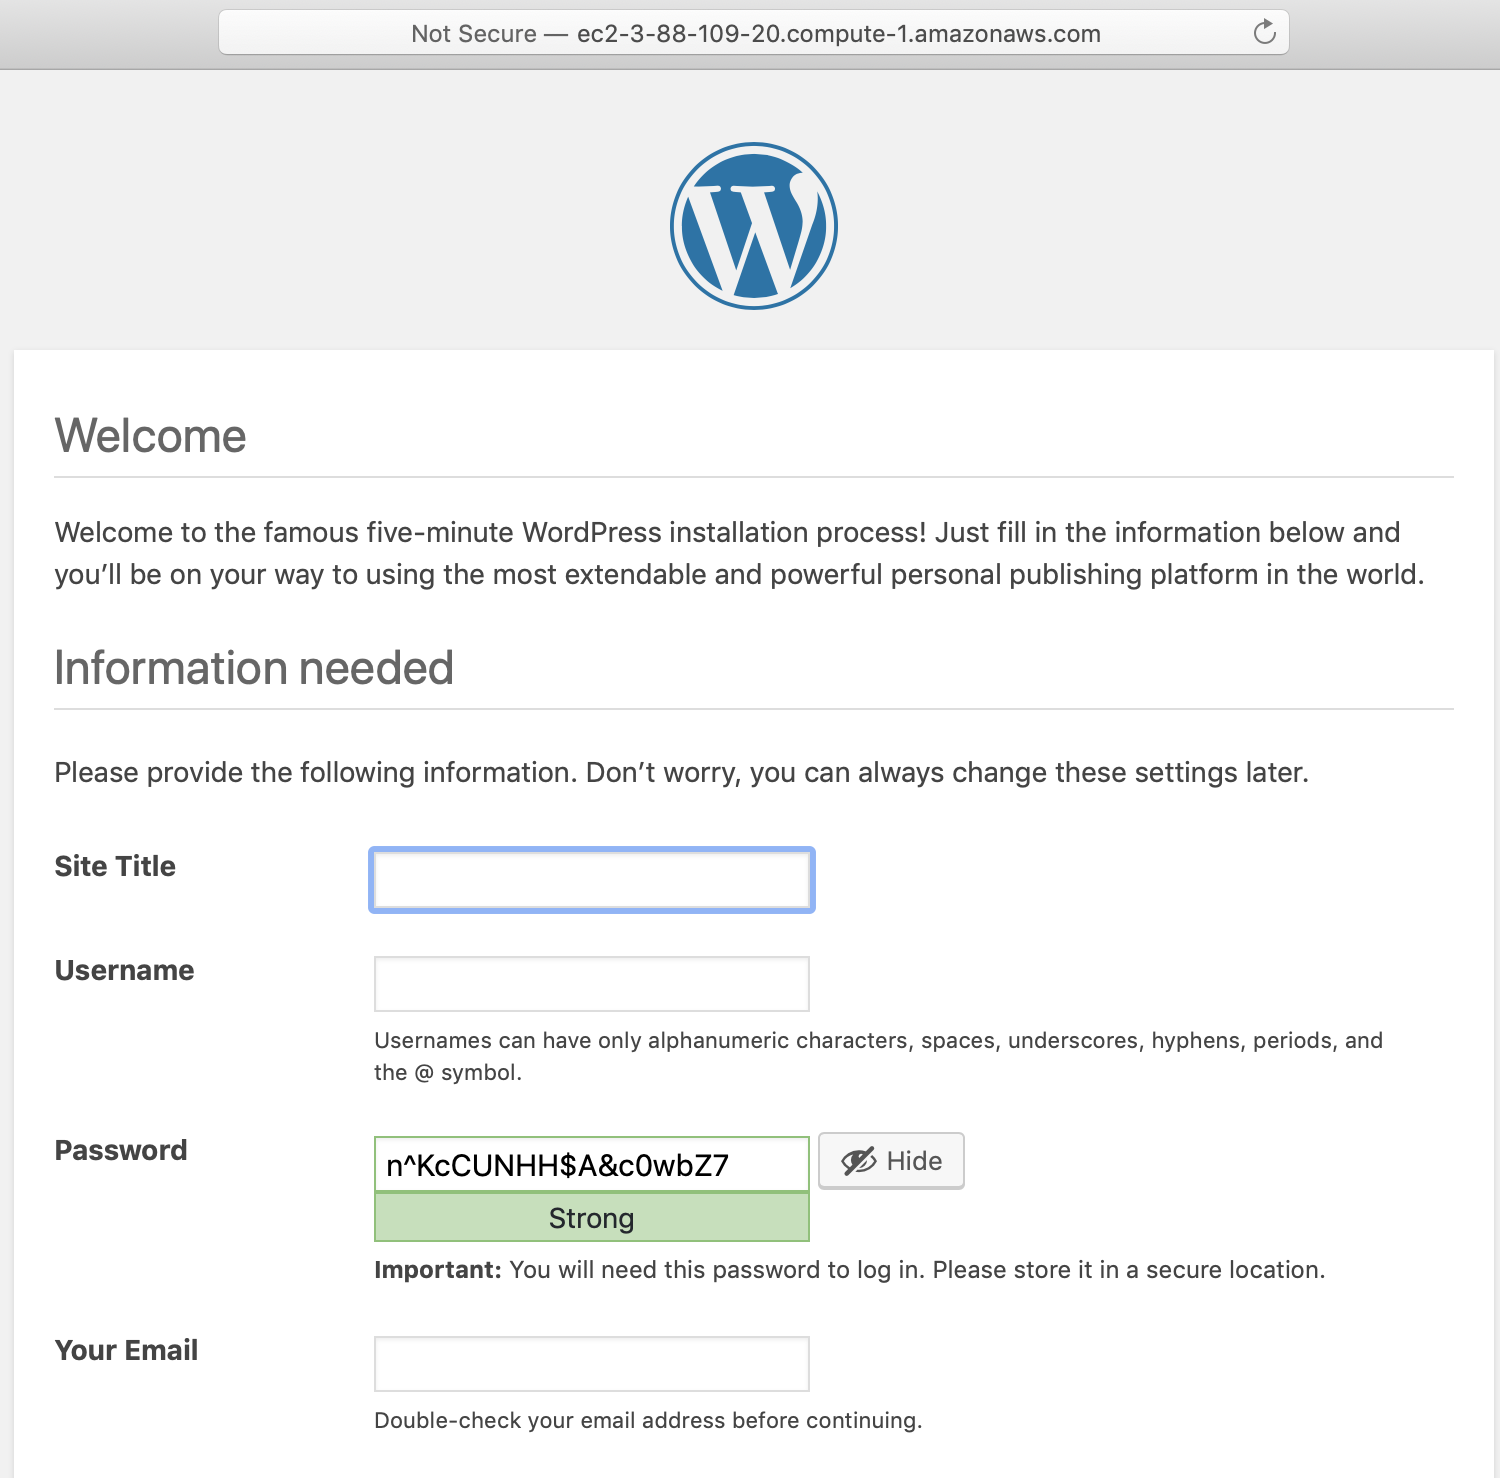
sudo service httpd restartYou should see the WordPress welcome page and the five-minute installation process.
8. Enable HTTPS / Load balancers and Update Route 53
Next I wanted to switch to HTTPS to access the site through https://www.ianstacey.net
- Created a new Elastic Load Balancer with HTTP and HTTPS support
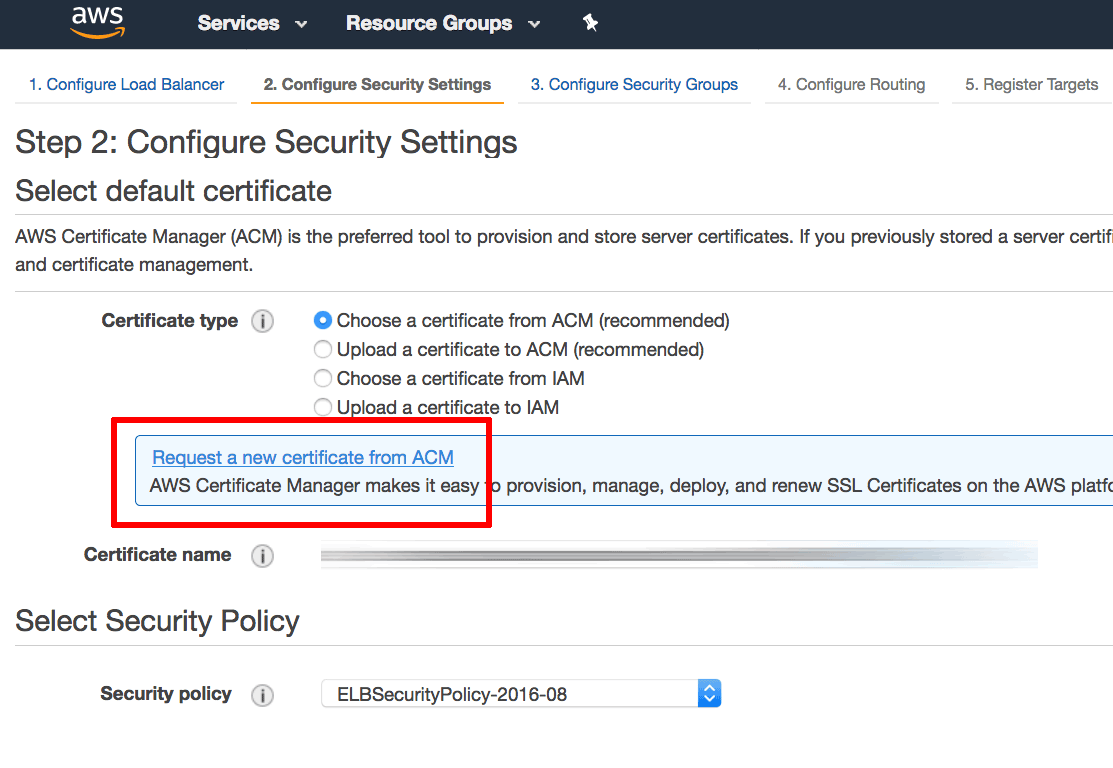
- Configured my Security Settings, requesting a new certificate from AWS Certificate Manager (ACM), using DNS validation.
- Configure the Security Group
- Configured the Routing
- Created my Target Groups for the ELB, registered the target EC2 instance and configured the Health Checks
- Updated Route 53 to point www.ianstacey.net and blog.ianstacey.net to the new ELB.
Issues:
After configuring the above I hit a couple of issues. Firstly the website was only displaying simple text. Once I fixed that I found links were trying to leave ianstacey.net and follow the Public IP of the instance.
To help isolate and resolve the second issue, I created a very simple static website with a couple of links:
[ec2-user@ip-10-84-1-125 html-static]$ cat index.html
 <!DOCTYPE html>
<html>
<title>HTML Tutorial is</title>
<body>

<h1>This is a heading yes</h1>
<p>This is a paragraph oh boy.</p>

 <a href="https://www.w3schools.com/">Visit W3Schools.com!</a>
 <br>
 <a href=link1.html>Visit Link1</a>
 <br>
 <a href=link2.html>Visit Link2</a>

</body>
</html>
[ec2-user@ip-10-84-1-125 html-static]$ cat link1.html
 <!DOCTYPE html>
<html>
<title>HTML Tutorial LINK1 </title>
<body>

<h1>This is a heading LINK1 </h1>
<p>This is a paragraph LINK1</p>

</body>
</html>
[ec2-user@ip-10-84-1-125 html-static]$ cat link2.html
 <!DOCTYPE html>
<html>
<title>HTML Tutorial LINK2 </title>
<body>

<h1>This is a heading LINK2 </h1>
<p>This is a paragraph LINK2</p>

</body>
</html>
[ec2-user@ip-10-84-1-125 html-static]$
Then resolved the WordPress settings, switching my apache root back to WordPress.

9. Next Steps
- Explore WordPress and its available themes and populate this site.
- Secure the site, I have the WP Cerber plugin enabled to help against brute-force attacks on the wp-admin page, limiting login attempts to 5 before blocking an IP address. Attempts to hide the wp-admin with https://wordpress.org/plugins/wps-hide-login/ did not work for me, so I plan to revisit this.
- Deploy a second EC2 instance in a different AZ and update my ELB Target Groups.
- Tear everything down and redeploy with CloudFormation.
- Monitor costs with Cost Explorer to ensure I keep within the free tier with Billing Alerts configured.


July 2021 Update: